
1. Email protection and phishing attacks
In a daily work we encounter different types of attacks that are using mail service as an attacking method. One of the most common is phishing, usually attempting to reveal sensitive information or to persuade end user to act in a way that may lead to information leak.
Whatever the mail protection methods are used, the weakest link is end user, which – besides regular security awareness actions – might be supported by additional information in case the received message comes from the outside of the company’s email organization.
2. Method no 1 – transport rule
The most common method to distinguish external messages is preparing dedicated transport rule that would add in message subject and/or on the top of the message body warning about the message being external. This way we can inform all (or some) of our users that message comes from the outside of the organization (even if from the displayed spoofed email address would look otherwise) and warn users not to send any sensitive information to this address in reply.
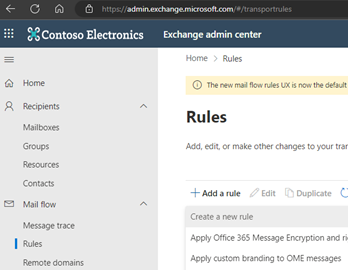
Even if there obviously is the corresponding PowerShell cmdlet, due to the large number of cmdlet options creation of the transport rules is one of the few things that in my opinion is better done using web administrative console (https://admin.exchange.microsoft.com/#/transportrules).
To prepare the transport rule the option ‘+ Add a rule’ should be chosen, and then ‘Create a new rule’.
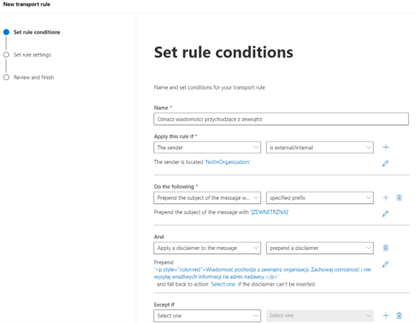
Next, when defining the rule conditions, the following settings should be defined:
- The rule name, that would allow to identify its meaning.
- As a condition (‘Apply this rule if’) – applying the rule to messages coming from outside of the organization (sender is located ‘NotInOrganization’)
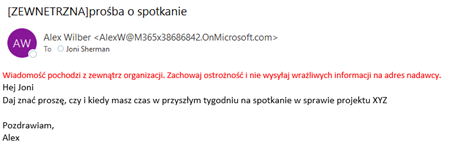
As an action – adding prefix ‘[EXTERNAL]’ to the message subject and the exemplary text formatted as html (“<p style=”color:red”>This message comes from the outside of the Company. Please be careful with putting sensitive information when replying to it.</p>”)
In the ‘Set rule settings’ step there is no need to change anything (alternatively more details about the rule can be added in the ‘Comment’ field in this step).
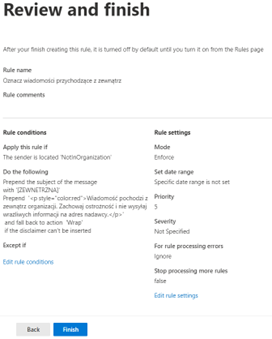
In the last step the rule settings should be reviewed and after clicking the ‘Finish’ button the rule will be created:
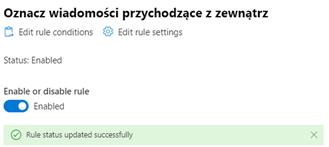
After creating, the rule should be enabled (it is disabled by default). To enable rule, it should be marked on the rule list, and then the switch ‘Enable or disable rule’ should be changed to ‘Enabled’.
After enabling, the rule works immediately – all external messages are marked in the way defined in the rule actions:
3. Method no 2 – using the global setting ‘External in Outlook’
Less known method to inform users about external messages is the built in functionality called ‘External in Outlook’. The functionality is available only in Exchange Online, is disabled by default, and, when enabled, affects all users in the organization.
Enabling the ‘External in Outlook’ functionality results in all messages being marked as External in desktop Outlook, Outlook on the web and Outlook mobile. In effect, there is an ‘External’ label being displayed next to the external sender’s name on the message list, and when the message is displayed – there is also a mail tip displayed, explaining that the sender is from the outside of the user’s organization.
We don’t have any possibility to change the label or mail tip text, but the label and mail tip language matches the mailbox language settings, which may be important for multinational organizations.
To enable the functionality the PowerShell connection to the Exchange Online has to be done first. By default, the functionality is disabled, which can be confirmed using ‘get-ExternalInOutlook’ cmdlet:

Using ‘set-externalInOutlook’ functionality can be enabled, as shown below:

It may take up to several hours for the functionality to start working, so don’t be surprised if it won’t start immediately.
This is how the external messages are then marked in the desktop Outlook:

And in Outlook on the web (note that mail tip additionally comes with the link to block the sender):

When we have external cooperants or partner companies we trust, their individual email addresses and/or mail domains can be additionally added to the ‘AllowList’ attribute of the External in Outlook functionality. As a result, messages coming from those addresses and mail domains will not be marked as external, which may be useful in particular implementation scenarios:

4. Differences, pros, and cons
Both methods described above are different, and even if technically possible, shouldn’t be used at the same time, not to multiplicate the information about external message source.
Transport rule seems to be more flexible – not only we can (by the additional condition) decide, whose users or user groups will be affected by such rule, we also can define the content and placement of the warning message. The downside is the fact that all the words added to the message subject and/or body will stay in the message when user replies on it (unless we prepare the other dedicated transport rule to remove those words for internal
messages send externally). For international organizations the downside might be the fact that the separate dedicated transport rule shall be prepared for each and every language group, which potentially complicates the whole solution.
On the other hand, the External in Outlook functionality is very simple (you should just turn it on), but as usual, with simplicity comes less flexibility. The undoubted advantage is displaying the labels in mail clients in the end user’s mailbox language.
 PL
PL